25 Sep 2016 - Two quick tests
The goal of this day was to do the first test of two new design modifications.
Title: Two new Designs
Series: Matching Archaeology (ÆZ); Pilots
Background:
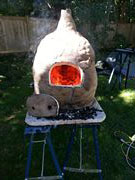
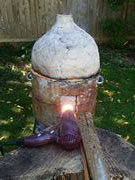
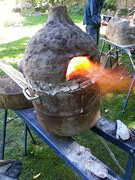
The first of these furnaces is based on Hearth ÆZ - a 30x60cm oval base. For this design air was added into one of the short ends. A door was cut in the other short side to allow charcoal to be added to the furnace. A single chimney on the same end as the loading door was set up to allow lampworking. Given the nature of the staffing (too few people) a hair dryer was used to supply air rather than the bellows for this pilot run. The hope was that the extra charcoal under the chimney would not ignite fully but would provide a filter to reduce the ash coming up through the chimney. The major concern was that there wouldn't be enough heat generated to melt the glass. The air source for this was the same hair dryer as used in our
Sep 2011 experiments - which generates 0.4 L/m. This is comparable to the standard bellows we use.
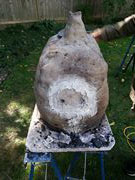
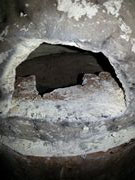
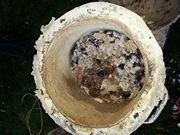
The second furnace was built on top of the 'ash measurement' furnace base. This new top had a shelf within it, and a working port above the shelf. The idea was that the shelf would block the ash and provide a clean working area.
Specific Question(s):
- Will this style of ÆZ furnace produce enough heat to work glass?
- Will this style of ÆZ furnace reduce ash volume?
- Round Base: Will the shelf reduce heat blast onto the bead worker?
Materials:
- Furnace: Cobb (clayy, sand, horse manure, approximately 1/3 of each material)
- Charcoal: Royal Oak (sized)
- Glass: Standard 104 CE lampworkers glass
- Air source: Hair dryer (0.4 L/m)
Steps:
- Build: Using the cobb mixed build the furnace to shape
- Harden: Allow the furnace to air dry
- Sinter: Using a wood fire, dry the clay, slowly raising the temperature as the water is driven off to sinter the structure to a ceramic
- Preheat: On the day of use - use wood to gently warm the body of the furnace
- Fire: open the top (or door depending on furnace), load charcoal, close the top. Seal the top in place using a clay/water mix. Turn on air.
- Work: At temperature (c. 800C) make the beads.
- Recharge: whent he temperature drops too far to work glass, open the top, refill with charcoal, replace and re-seal the top and start again
- Cool: When work is done for the day allow the furnace to cool
Variables:
- Oval furnace design
- Shelf design
Observations:
- Oval
- The results were good enough for the pilot run.
- Our newest bead enthusiast Rachel made several beads, while Jean and Neil each made a single one.
- The burn pattern was interesting - forming a long trench from the air inlet to the charging port, with only lightly engaged charcoal to both of the long sides.
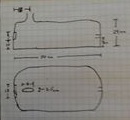
| Exterior length of base | 50 cm |
| Exterior width of base | 28 cm |
| Exterior height to shoulder | 24 cm |
| Exterior height to top of chimney | 39 cm |
| Access door height above ground | 10 cm |
| Tuyere height above ground | 9 cm |
| Access door height | 9 cm |
| Access door width | 13 cm |
| Chimney distance from end | 18 cm |
| Chimney width | 2.5 cm |
| Chimney length | 6 cm |
- Round
- This new design was much less successful.
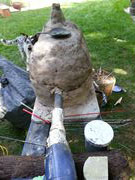
- With the working port closed the chimney behaved like a standard teapot (see the Oct 7, 2012 experiment for some video).
- The fit of the lid onto the base was leaky enough that getting close enough to work in the chimney was tricky.
- When the working port was open the hot air blast back out through it was so strong that working there was impossible.
| Exterior diameter of base | 28 cm |
| Exterior height to shoulder | 18 cm |
| Exterior height to top of chimney | 24 cm |
| Access door height above base | 2.5 cm |
| Access door height | 7.5 cm |
| Access door width | 12 cm |
| Shelf maximum depth to outside of wall | 9 cm |
| Shelf minimum depth to outside of wall | 5 cm |
| Chimney inside diameter | 3 cm |
| Chimney outside diameter | 6 cm |
Conclusions:
Further experiments on the oval design are warranted with temperature and airflow measurements, as well as ash measurements after the pilot for that measurement system is complete.
A second test of the shelf is likely worth doing - the shelf in this case broke early making it quite small on one side. Perhaps with a larger shelf with an upturned lip at the back the air flow would be less difficult. As for the fit of the lid it is a function of the test harness base and easily fixed in a future build.
Photos
 |
 |
 |
 |
| Oval Measurements |
Drying |
Oval furnace |
Oval furnace |
 |
 |
 |
 |
| Round measurements |
Round furnace |
Air problems |
Damaged shelf |
 |
| | |
| reusable base |
 Dark Ages Re-Creation Company