Iron Smelt - Laurel, ON - Oct 29, 2016
Date:Oct 29, 2016
Location:Laurel, ON
See also: Darrell Markewitz's ironsmelting site
Team: Richard Schweitzer, Darrell Markewitz, Neil Peterson, Vandy Simpson, Eric, Brandon, Nathan
Premise: Return to the Icelandic (Háls) series.
Furnace Design
| Type | Icelandic Turf construction with clay lining, tap arch |
| Extraction | bottom |
| Diameter | 0 cm |
| Height | 0 cm |
| Volume | 0 cm3 |
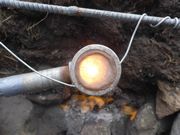
| Tuyure Type | copper tube |
| Tuyere height from base | 0 cm |
| Tuyere penetration into furnace | 0 cm |
| Tuyere angle | 0 deg |
| Base design | natural set base cm |
Burn Details
| Bellow Type | blower |
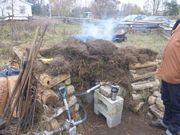
| Avg Air rate | est. 1000+ litres per minute |
| Total Charcoal Mass | 0 Kg |
| Avg Burn rate | 0 min per 2 Kg |
| Ore Type | DD1+ |
| Total Mass of Ore | 0 Kg |
| Burn Duration | 0 Hours |
Results
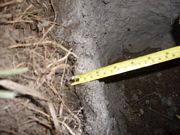
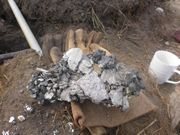
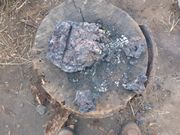
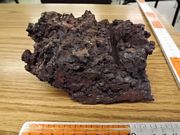
| Mass of Bloom | 2.5321 Kg |
| Bloom Type | 0 |
| Yield | 0% |
| Notes | 0 |
 |
Reports of all of our iron smelting efforts along with more articles and information are available on the "Iron Smelting in the Viking Age" CD from the Wareham Forge. Copies of the CD can be purchased here. |
Discussion:
- This smelter design is based on the archaeological research of Kevin P. Smith as presented in "Ore, Fire, Hammer, Sickle: Iron Production in Viking Age and Early Medieval Iceland".
- DARC has done a number of smelts based on this design, but not with a purely sod construction in a free-standing wooden frame.
- Preheat was a bit rough which spalled a lot of the clay lining off. This caused immediate problems with the slag bowl forming high. It also caused longer term problems with excess slag from the sand in the dirt of the sods dropping into the furnace.
- The bloom weight is lower than we had expected but we are hopeful that on additional invesigation we will find more small bloom masses within the bowl.
- The major modern intrusion to likely Norse / Viking Age method remains the use of high volume air via the electric blower.
Conclusions:
There were several concerns that were evident before the smelt even started -- and all of them became issues.
- A full bag of powdered clay proved to be insufficient and the 3 cm thick wall topped out at 60 cm. This meant that the top 30 cm was only turf. It was also wider as it was left with the assumption that clay would be acquired later. As the organics of the turf burned away, this top section gradually eroded and took on a cone shape. This not only put more dirt (silica) into the smelter and increased the slag, but it also may have affected where the ore fell in the shaft.
- The weather in the preceding week was wet and cold, with 5-10 cm of snow falling mid week. It was warm on the Friday, which helped, but with the damp the clay liner (which hadn't been completed as early as planned) had no chance to dry. As a result, there was massive spalling right from the start during the pre-heat, even before we switched to the charcoal. Twice we opened the bottom to remove partially slagged ceramic material. Fortunately, this was before we had started adding ore, but even after, it took a long time before things stabilized. Two more times we had to open up the bottom to try to lower the bowl and/or tap the slag. We also were constantly battling to keep the tuyere clear as slag froze over the opening. As a result, there were multiple interruptions or reductions in the air flow.
- During construction, things shifted and the round cylinder turned into more of an oblong, egg shape. This may have increased wall erosion as the narrow edges near the tuyere were the damaged first. This may also have been a factor with our air. Despite the blower running fully open (a first for a DARC smelt), the blower didn't seem to get full penetration.
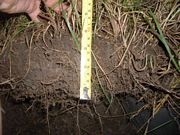
- The soil in the area is very sandy. This seems to have created several problems. Firstly, the grass root mass penetrated deeper into the soil, but without much density. This lead to some structural issues during construction, and there were real concerns of the exposed front wall collapsing during the smelt. Secondly, there was no sintering of the soil which might have happened if there had been a higher clay content.
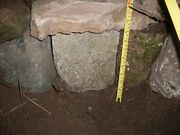
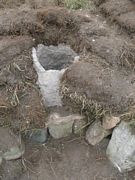
Concerns over structural integrity led to a log and later a pipe being added, along with several sod blocks, but the threatened collapse of the front never did materialize. Much of the credit goes to the stone lintel over the tap arch which played a big role in stabilizing everything as we fought with the slag. The addition of extra sod blocks at the bottom did a good job of controlling unwanted jets of flame without too much extra effort, with the added bonus of being easy to remove when necessary.
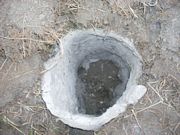
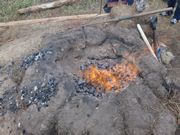
In the end, the degradation of the smelter made a front extraction a foregone conclusion. Adjusting the air hoses out of the way was the only tricky step, and that was minor. When the smelter was opened up, the bloom was retrieved easily and quickly moved for consolidation.
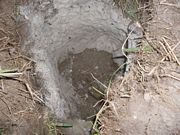
The bloom was a bit smaller than usual, but the smelter still needs to be investigated for other bloom material and "gromps" (iron bearing slag).
The copper tuyere worked exceedingly well. Care was made to keep as much of the copper exposed to insure that it could radiate the heat efficiently, but despite the issues during the smelt, it didn't seem to show any sign of wear.
The wooden crib was not affected by the heat until the extraction, at which point the short sections that were angled in toward the tap arch began to smoulder. Clearly the 90 cm gap was just about perfect -- any narrower, and the crib might have caught fire, any wider and it would have been too wide to reach over to add ore and charcoal.
The stone lintel over the removeable block worked well. We accessed the interior several times without destroying the smelter. However, concerns over the sod immediately above the tuyere suggest that the sod there might be better replaced with more stone, or with a wider foundation for the sod at that point (a second lintel above the tuyere?) .
The emergency wooden support log lasted surprisingly well considering it was dry cedar. As it didn't burn through until the bloom was pulled, this suggests that green hard wood poles could work to make a base for a wider front wall above the tuyere.
The profile ended up much flatter than the 45 degree angles shown in Smith's reconstruction. However, the space seemed to work fairly well. Whether it works as well with bellows remains to be seen.
Photos:
 |
 |
 |
 |
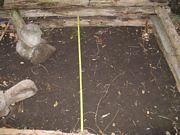
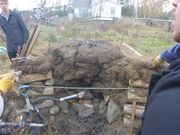
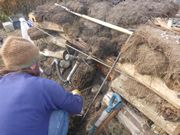
| Wooden frame |
Cut Sod |
Tap Arch |
First layers |
 |
 |
 |
 |
| 3 layers finished |
Clay lining |
Lining pulling away |
Clay wall |
 |
 |
 |
 |
| clay lining |
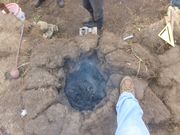
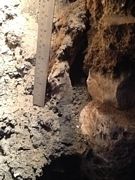
Overview |
From the top |
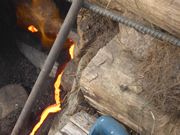
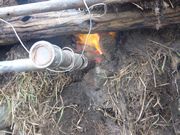
Leaking flames |
 |
 |
 |
 |
| Fun View |
Slagged walls |
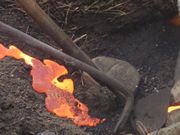
Tapping |
Running Slag |
 |
 |
 |
 |
| Lots of slag |
Collapsing top |
Vanishing walls |
Bloom bits |
 |
 |
 |
 |
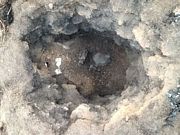
| Aftermath |
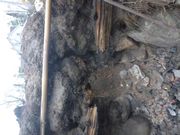
Erosion |
Wall Remains |
Large bloom |
Raw Data:
| CLOCK | ELAPSED | EVENT | AIR | CHARCOAL | ORE |
|---|
| | | | | UNIT | COUNT | TOTAL | ADD | TOTAL |
|---|
| | | gate | LpM | bucket | | kg | Kg | kg |
|---|
| | | | | | | | | |
| | | | | | | | | |
| | | | | | | | | |
| | | | | | | | | |
| | | | | | | | | |
| | | | | | | | | |
| | | | | | | | | |
| | | | | | | | | |
| | | | | | | | | |
| | | | | | | | | |
| | | | | | | | | |
| | | | | | | | | |
| | | | | | | | | |
| | | | | | | | | |
| | | | | | | | | |
| | | | | | | | | |
| | | | | | | | | |
| | | | | | | | | |
| | | | | | | | | |
| | | | | | | | | |
| | | | | | | | | |
| | | | | | | | | |
| | | | | | | | | |
| | | | | | | | | |
| | | | | | | | | |
| | | | | | | | | |
| | | | | | | | | |
| | | | | | | | | |
| | | | | | | | | |
| | | | | | | | | |
| | | | | | | | | |
| | | | | | | | | |
| | | | | | | | | |
| | | | | | | | | |
| | | | | | | | | |
| | | | | | | | | |
| | | | | | | | | |
| | | | | | | | | |
| | | | | | | | | |
|
Reports of all of our iron smelting efforts along with more articles and information are available on the "Iron Smelting in the Viking Age" CD from the Wareham Forge. Copies of the CD can be purchased here. |
 Dark Ages Re-Creation Company